Sunday, August 16, 2009

Water.


Water.

So this morning I was going to post about water purification but then I find out that I had no water in my house what so ever! so on top of posting about water purification I am going to post about what you can do if you come across this type of situation.
Safe drinking water is a MUST have in a survival situation . So you need to have approx 1-2 gallons of water per person per day.
This is not enough if you are in a hot climate or are doing a lot of manual heavy work. As the body needs more water in this type of situation. Anyway if you find like I did that one day you have no water first things first you switch off the mains water so it doesn’t get drawn back into the main water line. Now tell everyone in family whom live in house to stop an think before they flush the toilet etc.
Now drain the hot water tank as there will be no cold water pressure to push the water around the house so drain the tank into containers that can be sealed tight. Now you have X amount of safe drinking / washing water.
You can remove the top of the toilet cistern so you can pour dirty water onto there to help flush the toilet. if possible use water that has been used to wash with, so it is not a waste. So anyway on with my next posting.

Water purification.

Okay this topic is IMPORTANT let me say that again this topic is IMPORTANT!!! .

If you mess this up in training the worst you’ll get is a bad stomach bug but in a survival situation this could mean your death! So I’d recommend you practice this over and over again!
But who am I to tell you what to do ;)
First things first it is possible to make drinking water from any water source. However I personally would recommend you stick to rivers or fast moving streams as these are easier to make into safe drinking water. However the following way works on most water sources.
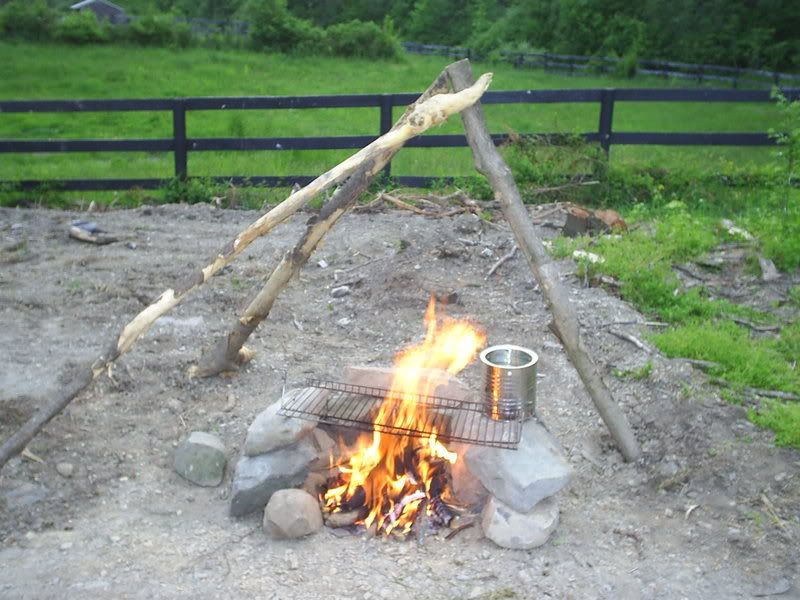
You will need 3 large pieces of material the tighter weave the better and some string and 3 1“ thick 5 ft long branches.
Push the ends of each branch into the ground as much as possible.
Tie the ends together to make a teepee shape.
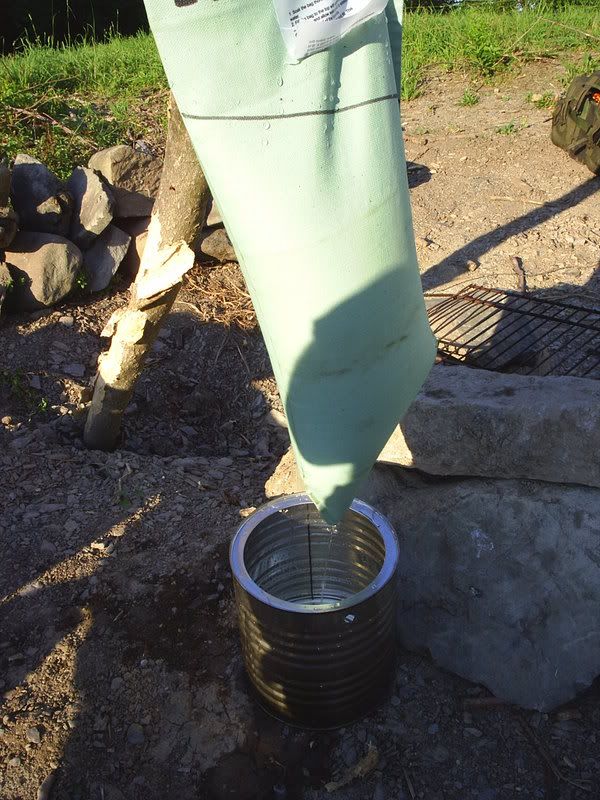
Now tie at different heights the 3 pieces of cloth so they sag slightly in the middle making them layer above each other.

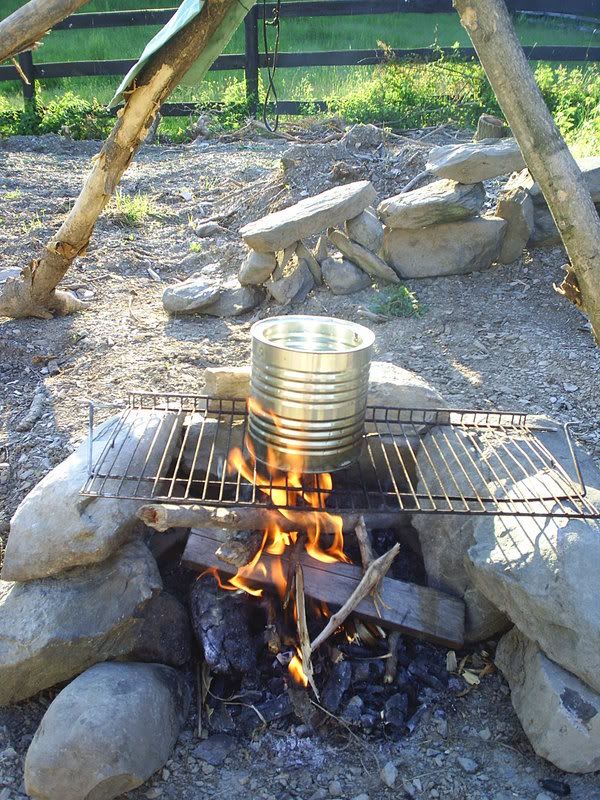
Now you have 2 options you can either just use this as it is by pouring the water SLOWLY onto the top piece of material until all the water has been put into it… now place your CLEAN container underneath the lowest layer of material and wait.
Once the water has dripped thru the 3 layers of material into your clean container you then boil this water for 3 minutes then leave to cool and then you have safe drinking water.

Option 2 is to put sand into the second layer of material and charcoal into the lower layer with leaves and grass in the top layer. Then do as above and pour the water in. The sand / charcoal / leaves and grass help filter the water more then without them but either way will work.
Now after all this if you are still unsure of the water put in a water purification tablet … shake the container with the tablet inside and follow the instructions on the bottle. But remember these tablets are a rare resource so in a survival situation they are to be used sparingly.
Now this is just a brief outline of how to do this using just one way. There are also many other ways to make safe drinking water. I would suggest you learn at least 2 other ways.
I hope this helps you in some way.

Please feel free to join this blog and add more to the list to help each other out.

Tuesday, August 4, 2009

Making Fire


Making fire.

Todays topic is as the title says making fire .
Man has been making fire since he was living in caves so if they could make it way back then , then we can do it nowadays.
Before we start to build a fire we need to decide how to make the fire ignite. There are many ways to do this from a simple use of a candle ( you light the candle with a match NEVER try to light a fire with a match as you just end up wasting them! ) another way ( my favorite one ) is the flint and steel. The rubbing 2 sticks together has yet to work as far as I know but I can say that making a fire bow really works! Even if you have a broken lighter as long as its sparking it can be used. Whichever one you decide to use make sure using it is second nature to you. I recommend that you learn more then 3 different ways to make fire and master each of them.
First items needed are the following: a means of making fire ( something like a BIC lighter to a flint and steel ) tinder (a birds nest works really well if you can find one ,but the shape is what your tinder should be looking like.), kinderling ,medium size sticks then larger sized sticks finishing up at logs.
Make sure you have a good sized pile of each BEFORE you start to make any type of fire.
All wood used to make fire MUST be dry!
If you have no dry wood to use then using your knife shave the wood making curls into the middle of the stick this is called making a fire stick. This will catch fire a lot easier even if damp.
Tinder can be almost anything. Dry grass, paper, cotton wool from your first aid kit , lint from your pocket, the list is almost endless.
Kinderling is very small sticks ( twigs ) shaved if necessary into the middle where the wood is driest.
Once you have a good amount of the burnable needed to make and sustain a fire you need to pick a suitable place to make a fire.
Wet ground wont help the fire!
Is possible set the fire up against something that wont burn but will reflect the heat from the fire back towards you like a stone wall or a pile of logs if they are approx 24” away from the fire. If you make a reflector it will also double as a windbreak and a way to dry damp/wet logs.
Anyway place tinder on the ground and fluff up the tinder ruffing up the edges so they will catch the sparks or fire more easy.
Next make a small wigwam out of kinderling around the tinder DO NOT SMOTHER the tinder with too much kinderling as the tinder needs air to make the fire grow.
Now using whatever means you have … be it a BIC lighter to a flint and steel light the tinder … BUT make sure all the rest of the wood is ready and close to hand …. Now that the fire has caught the kinderling … usually you can hear it crackerling add the next layer of wood and SLOWLY make the fire bigger until you are adding the larger sized pieces of wood.
Once you have the fire burning at the size you want it is very easy to run out of the correct sized pieces of wood so to help with this … try these 2 methods out.
On finding several large logs that cannot be cut put a end of each log into the fire you can do this to have upto 4 ends in the fire at any one time … if the fire looks like it is burning to fast pull out each log by like 6” this will slow the burn rate down … and if the fire looks like it will go out push these logs in more …. This way you can control the fire just by moving the logs into or out of the fire by only moving them a maximum of 6”.
The other method is placing the large log directly into the fire so the fire is burning the middle section of the log thus basically cutting the log into a more useable size. Once it burns thru remove one section and repeat if necessary.
This is of course a very brief outline on making fire if you wish to know more feel free to contact us and im sure we could arrange a demo so you can see this being done in person.

Please feel free to join this blog and add more to the list to help each other out.